Blog Automation Test: Comparison and Alternatives for Reliable Publishing
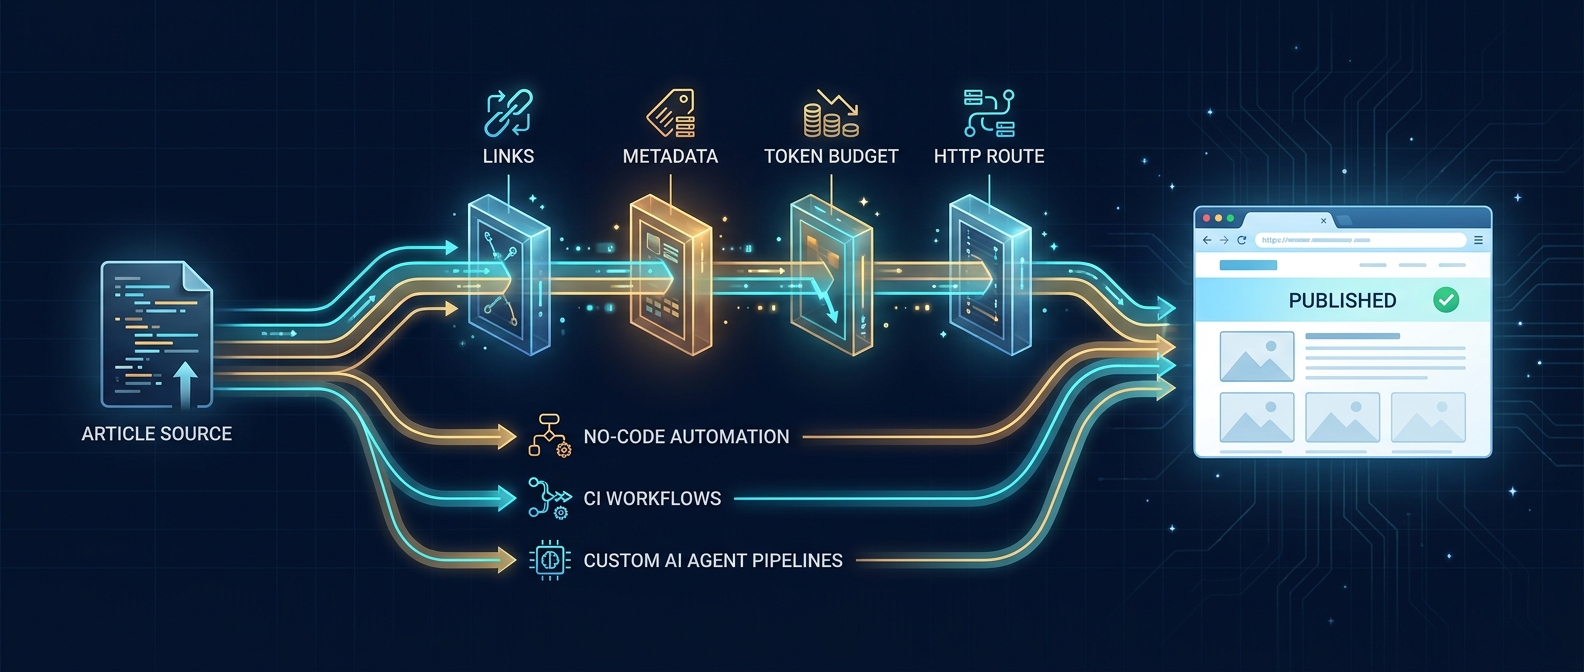
Automating a blog is easy until the workflow publishes a broken canonical URL, repeats an old article, drops the hero image, or sends a prompt that quietly doubles your LLM cost.
A useful blog automation test: comparison and alternatives guide should therefore compare more than writing tools. It should compare the ways a team can verify the entire publishing path: content generation, metadata, links, media, CMS delivery, localization, and the live route.
This guide compares four practical approaches:
- Manual pre-publish review
- No-code workflow checks
- CI-based blog automation testing
- Custom agent pipelines with release gates
The short version: manual review is flexible but difficult to scale; no-code automation is quick to assemble but can become opaque; CI is strong for deterministic checks; and custom agents are useful when research, generation, publishing, and validation must happen in one workflow. Most production teams benefit from combining CI-style deterministic tests with a controlled content agent.
What Is a Blog Automation Test?
A blog automation test is a repeatable check that determines whether an article or publishing workflow is safe to release. It can run before the article enters the CMS, immediately after publication, or at both stages.
The important distinction is between content review and workflow testing.
- Content review asks whether the article is accurate, useful, readable, and on-brand.
- Workflow testing asks whether required fields exist, URLs resolve, metadata is valid, images load, translations publish, and the final route returns the expected response.
A mature blog workflow needs both. An article can read well and still fail operationally. A technically successful publish can also produce thin, duplicated, or unsupported content.
For AI-assisted publishing, add a third layer: resource controls. Prompt size, model choice, output limits, retries, and localization volume can all change the cost and reliability of a run. A blog automation test should treat these variables as release constraints rather than after-the-fact analytics.
Blog Automation Test Comparison at a Glance
| Approach | Best for | Strengths | Main limitation | Typical checks |
|---|---|---|---|---|
| Manual review | Low publishing volume and sensitive editorial work | Flexible judgment and nuanced fact review | Slow, inconsistent, and hard to reproduce | Accuracy, voice, screenshots, final page review |
| No-code automation | Small teams connecting forms, spreadsheets, CMSs, and notifications | Fast setup and broad integrations | Complex branches and retries can be difficult to audit | Required fields, status changes, basic notifications |
| CI-based tests | Developer-led content systems and docs-as-code | Versioned, deterministic, repeatable, visible in pull requests | Requires engineering ownership | Links, front matter, schema, linting, build, route smoke tests |
| Custom agent pipeline | High-volume AI research, generation, localization, and publishing | Can coordinate multiple content and publishing stages | Needs strict permissions, observability, and stop conditions | Source grounding, duplication, token budgets, CMS response, live-route validation |
This blog automation test comparison and alternatives table is not a winner-take-all ranking. The right choice depends on where your content lives, who owns the workflow, and which failures are expensive for your business.
Option 1: Manual Pre-Publish Review
Manual review remains the simplest alternative to automated blog testing. An editor checks the draft, metadata, links, image, and preview before clicking publish.
When manual review works
- You publish infrequently.
- Every article contains sensitive legal, medical, financial, or customer claims.
- The CMS preview accurately represents the live page.
- The cost of an editor is lower than the cost of building and maintaining automation.
Where it breaks down
Manual review is difficult to reproduce. Two reviewers may check different fields. Repetitive checks such as missing descriptions, invalid slugs, broken internal links, or an absent image are easy to overlook. Localization multiplies the number of pages that need inspection.
Manual review is best used for judgment-heavy questions, not as the only defense against deterministic failures.
Option 2: No-Code Workflow Automation
No-code and low-code platforms can connect a content source to an approval step, CMS action, spreadsheet log, and notification channel. This can be a practical first implementation when the team does not maintain a repository-based content system.
Advantages
- Fast integration with common business tools
- Visual workflow editing
- Simple triggers and notifications
- Accessible ownership for marketing operations teams
Tradeoffs
Visual workflows can become hard to reason about when they accumulate branches, filters, retries, and language-specific behavior. Testing may also focus on whether a step executed, not whether the published result is correct.
For example, a “create post” action can return success while the public route remains unpublished, the canonical URL is wrong, or the cover image is inaccessible. Add explicit readback and HTTP route checks instead of treating a successful connector action as proof of a successful release.
In a blog automation test: comparison and alternatives decision, no-code platforms are strongest as orchestration layers. They are less suitable as the only quality system for complex AI-generated content.
Option 3: CI-Based Blog Automation Testing
CI-based testing treats an article like a versioned software artifact. A pull request can run checks before the content is merged or deployed. GitHub Actions and similar CI systems are useful here because test definitions live alongside the content and can be reviewed with each change.
Typical checks include:
- Required front matter exists.
- The slug uses an allowed format.
- The page contains one H1.
- Meta title and description stay within team-defined limits.
- Internal and external links resolve.
- Images exist and include alt text.
- Structured data parses.
- The static site builds successfully.
- The preview or production route returns HTTP 200.
A minimal workflow might look like this:
name: blog-release-check

on:
  pull_request:
    paths:
      - "content/blog/**"

jobs:
  test-article:
    runs-on: ubuntu-latest
    steps:
      - uses: actions/checkout@v4
      - uses: actions/setup-node@v4
        with:
          node-version: 22
      - run: npm ci
      - run: npm run lint:content
      - run: npm run test:links
      - run: npm run build
The commands are examples; the important design choice is that the same tests run for every relevant change.
Where CI needs help
CI is strongest when a rule has a clear pass or fail result. It cannot independently determine whether a comparison is fair, a claim is sufficiently supported, or a paragraph actually answers search intent. Those checks need human review or a constrained content-evaluation step.
Option 4: Custom Agent Publishing Pipeline
A custom agent pipeline can research a topic, draft an article, create an image, publish through an API, generate translations, validate routes, and record evidence. This approach fits high-volume programs where the workflow is more complex than “move approved text into a CMS.”
The flexibility is valuable, but it creates new failure modes:
- The agent invents a product claim or comparison.
- A retry creates duplicate posts.
- A local image path is sent to the CMS instead of a public asset URL.
- Translation succeeds for one language and fails silently for another.
- The source post publishes, but the live route returns 404.
- Prompt growth or repeated retries increases token usage beyond the expected budget.
The solution is not a longer prompt. It is a set of explicit gates, bounded permissions, and machine-readable evidence.
For teams evaluating a blog automation test comparison and alternatives strategy, the custom agent route makes sense when automation must do real production work and the team is prepared to test it like production software.
The Minimum Test Suite for Automated Blog Publishing
Regardless of tooling, use the following release matrix.
| Stage | Required test | Failure action |
|---|---|---|
| Topic selection | Search intent and article type match the query | Stop and revise the angle |
| Research | Material claims have approved or primary sources | Mark unsupported claims or remove them |
| Draft | No internal notes, placeholders, or duplicate H1 | Block publishing |
| SEO metadata | Slug, title, description, canonical, and category are present | Block publishing |
| Internal links | Anchors are relevant and destination routes exist | Repair or remove the link |
| Image | File is original, relevant, accessible, and has alt text | Recreate or re-upload |
| Token budget | Input, output, retries, and translation scope remain within policy | Fail or require an explicit override |
| CMS create | API returns a real post ID | Stop; do not invent an ID |
| Source publish | CMS reports published status | Stop translations if source publishing fails |
| Localization | Every configured target language has a recorded result | Report each language separately |
| Route validation | Source and localized URLs return HTTP 200 | Retry within limits, then report the exact failure |
| Readback | Cover image, metadata, language, and status match the payload | Flag drift and stop completion |
This matrix turns a vague “did the automation work?” question into a sequence of verifiable results.
Add Token Budgets to the Release Gate
Token usage is easy to ignore in blog automation because each individual generation appears inexpensive. The workflow total can be much larger than the article body once it includes research prompts, source extraction, outlines, revisions, metadata, image prompts, translations, retries, and validation summaries.
Set budgets at three levels:
- Per step: Limit the context and output for research, drafting, editing, and translation.
- Per article: Sum every model call, including failed attempts and retries.
- Per batch: Cap the total cost of a daily or weekly publishing run.
Do not use one universal threshold for every article. A technical comparison with several sources may need more context than a glossary page. The goal is to detect unexplained regressions, not to force every task into the same size.
Before adding hard limits, inspect which prompt sections consume the most tokens. Then build a token-aware prompt review process so prompt growth is visible in normal engineering review.
If the workflow supports multiple providers, compare token usage across OpenAI-compatible models with the same fixtures. API compatibility does not guarantee identical tokenization or cost behavior.
How to Choose the Right Alternative
Use these decision rules:
Choose manual review when
- Volume is low.
- Editorial judgment is the primary risk.
- The workflow is not yet stable enough to automate.
Choose no-code automation when
- Marketing operations owns the process.
- The CMS and source tools already have reliable connectors.
- The workflow mainly moves structured fields between systems.
Choose CI-based testing when
- Content lives in Git or is generated into repository files.
- Engineers own the release process.
- Deterministic checks and change history matter.
Choose a custom agent pipeline when
- Research, drafting, media, publishing, localization, and validation must run together.
- You can restrict credentials and actions.
- You require evidence for every side effect.
- You can stop the workflow on concrete failures instead of publishing partial or guessed results.
Choose a hybrid when
- You want an agent to prepare and publish content, but CI or deterministic scripts should verify fields and routes.
- Editors review high-risk claims while automation handles repetitive checks.
- No-code triggers start the process, but API readback confirms completion.
For most developer-focused teams, the hybrid is the practical answer to the blog automation test: comparison and alternatives question.
A Practical Hybrid Architecture
A reliable workflow can use five stages:
- Plan: Select the query, intent, content type, and approved sources.
- Generate: Draft the article and metadata within defined token budgets.
- Test: Run deterministic checks for fields, links, images, schemas, and duplication.
- Publish: Create the source article, upload media, publish, and generate configured translations.
- Verify: Read back CMS data and request every public route.
Store the result of each stage as an artifact. A completion record should include the source post ID, public URL, uploaded image URL, translation results, route status codes, and any failed attempt. That evidence makes failures debuggable and prevents an automation system from declaring success based only on its own intent.
Common Mistakes in Blog Automation Testing
Testing only the draft
A perfect Markdown file does not prove that the CMS preserved the metadata or that the public page works.
Treating an API 200 as complete success
The request may succeed while the post remains a draft or a localized route is missing. Verify state and public routes separately.
Using retries without idempotency
Blind retries can create duplicate assets or posts. Reuse stable slugs, check existing records, and record attempt results.
Comparing tools by feature count
A long integration list does not tell you whether a tool can validate your highest-risk failure. Start with the release matrix, then choose tooling.
Ignoring prompt and translation cost
An automation may be operationally correct but economically inefficient. Track token and cost changes as regressions.
Final Recommendation
The best blog automation testing approach is the smallest system that catches your expensive failures before they reach readers.
- Keep humans for nuanced claims and editorial judgment.
- Use no-code tools for straightforward orchestration.
- Use CI for deterministic, versioned release checks.
- Use custom agents when the workflow must coordinate research, generation, publishing, localization, and verification.
- Add token budgets and retry limits before scaling volume.
A useful blog automation test comparison and alternatives process does not end when the CMS accepts a request. It ends when the correct article, image, metadata, translations, and public routes have been independently verified.
TokenTest helps teams make token usage and prompt growth testable before automated AI workflows scale. Start by testing the prompts that generate, revise, and localize your content, then add those limits to the same release gate that checks the final page.